Getting Started with Elixir Forge
Elixir Forge is a web app for designing drink recipes. You build a recipe in stages and the app checks the chemistry as you go. It tells you when an ingredient will not stay dissolved or when a flavor is over its recommended limit. It also reports the sugar, acid, carbonation and alcohol content of the finished drink. This post is a basic tutorial for new users which follows one recipe from the library through every stage of the builder.
NOTE: the ingredient data in Elixir Forge is researched but illustrative. It is a design tool and not a regulatory reference. Verify any usage limits against 21 CFR, FEMA and your supplier's specifications before you make anything for sale or consumption.
The app lives at elixir-forge.com. It is still in active development and a banner at the top of the page says so. Data you enter may be lost at any time, so export anything you care about (covered below).
The recipe library
The home page is the Recipe Library. At the time of writing it holds 178 recipes built from 511 materials. Most of them are cocktails (162) but there are also 8 sodas, 5 liqueurs and 3 fermented drinks.
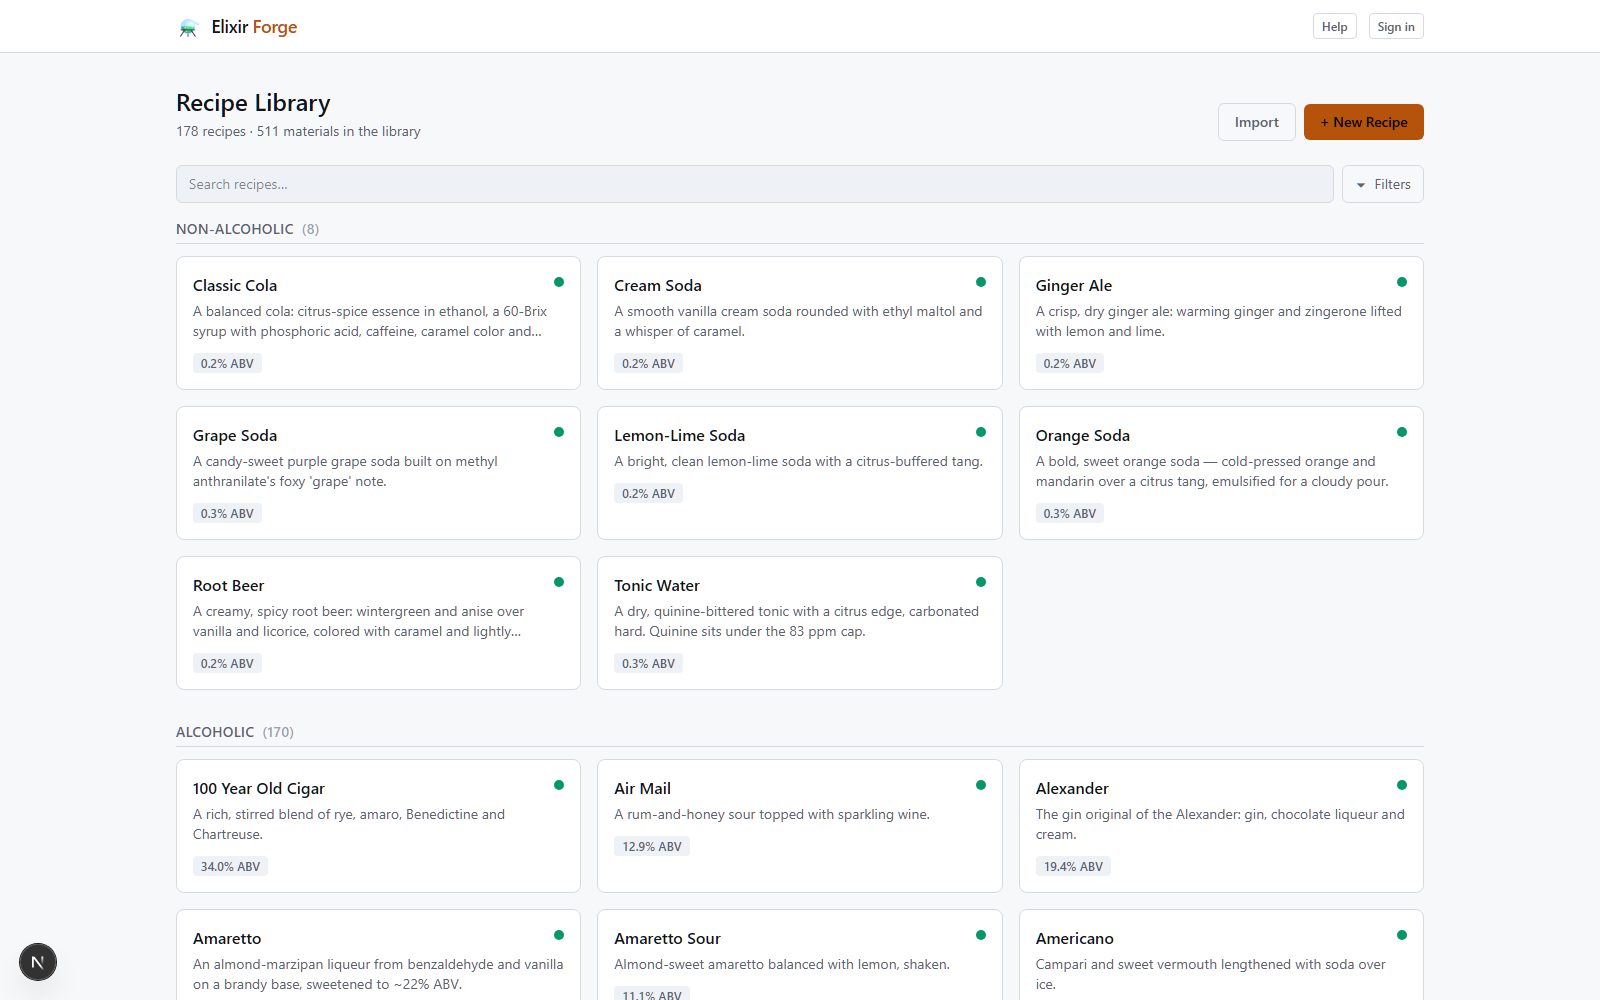
Recipes are grouped by their computed alcohol content. Alcohol Free is 0% ABV and Non-Alcoholic is anything above zero but under the 0.5% legal cutoff. Alcoholic is everything at 0.5% or above. This is why a cola shows up as 0.2% ABV. The flavor oils in a soda are carried in ethanol and a trace of it survives into the final drink.
Each card has a small colored dot where green means the recipe is in spec and red means something in it needs attention. The search box filters by name. The Filters button opens a template dropdown and a set of tag chips grouped by spirit, flavor, style and occasion.
Do you need an account?
No. You can browse, create and edit recipes without signing in. Anything you create anonymously is public and can be edited by anyone.
Signing in with Google, Microsoft, GitHub or Facebook lets you own your recipes. Recipes you create while signed in start out Private and nobody else can change them. The recipes which ship with the library are owned by the site. You can open and use them but you cannot edit them directly. To change one you make a copy.
Opening a recipe
Click the Classic Cola card and the recipe opens in a read-only view.
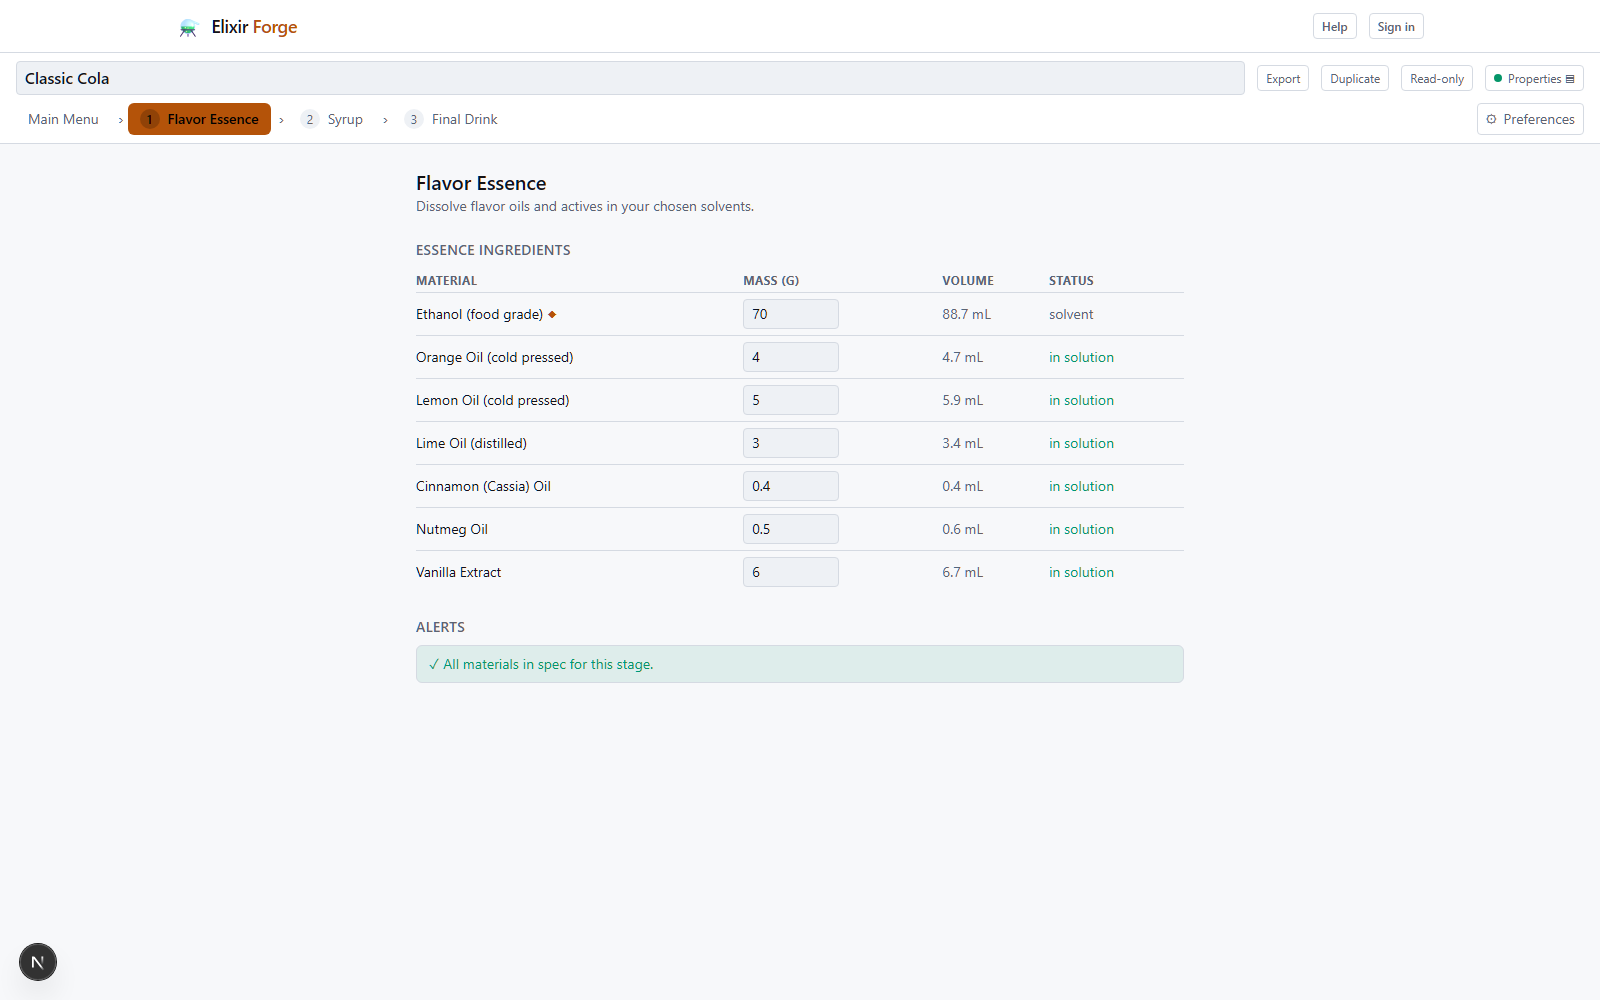
Across the top is the breadcrumb which starts with Main Menu (back to the library) and then lists the stages of the recipe in order. A soda has three stages named Flavor Essence, Syrup and Final Drink. Click any stage to jump to it.
Since this is a library recipe it is marked Read-only. Click Duplicate to make a copy which you own. The copy is named "Classic Cola (copy)" and opens directly in the editor where everything below is done.
Stage 1: Flavor Essence
A soda starts as a concentrated essence. Flavor oils do not dissolve in water so they are dissolved in a solvent first. In Classic Cola that solvent is 70 g of ethanol carrying orange, lemon, lime, cinnamon and nutmeg oils plus vanilla extract.
Each ingredient row has a mass field, a read-only volume and a status. Solvents are marked with a ◆ and show "solvent" as their status while everything else should read "in solution".
To add an ingredient click + Add material or the ☰ Materials button. This opens the Material Library drawer on the left side of the page.
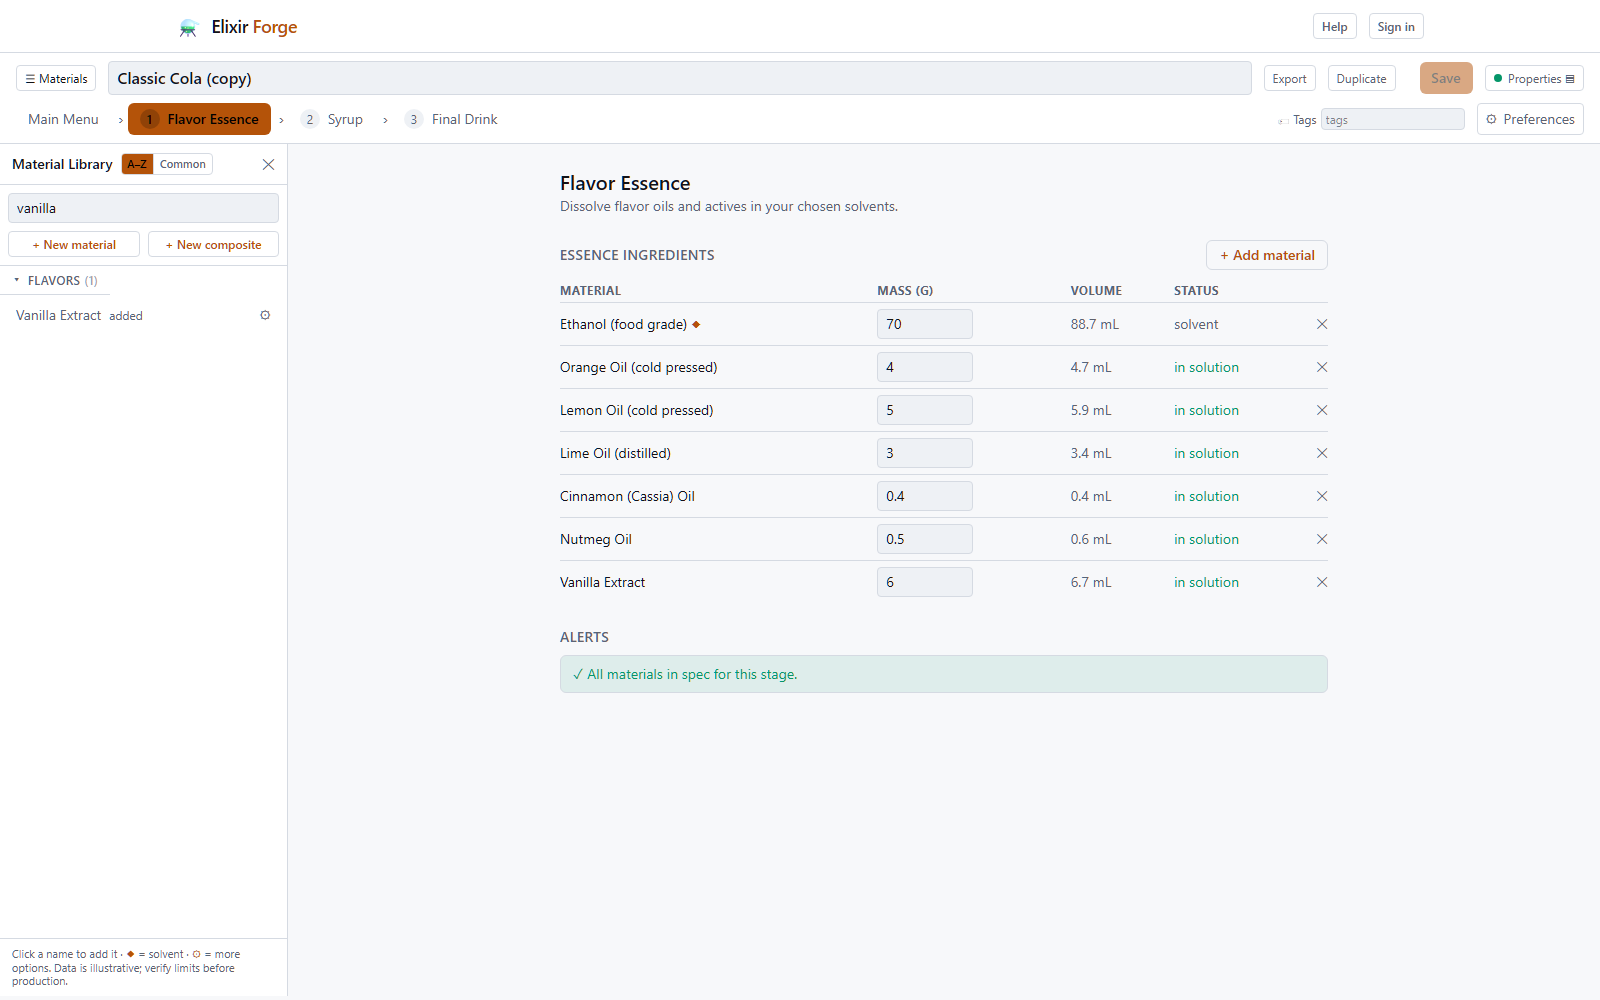
Materials are sorted into categories such as Flavors, Sweeteners, Acids, Spirits, Preservatives and Solvents. Type in the search box to narrow the list and then click a name to add it to the stage you are on. The ⚙ icon next to a material opens its detail card. The A–Z and Common buttons change the sort order.
The drawer also lists composites. A composite is a fixed-ratio premix (simple syrup, a vermouth or a liqueur) which you add as one line. The engine breaks it back into its constituents for all of the chemistry. Those constituents are shown indented underneath the composite and cannot be edited on their own.
Stage 2: Syrup
The second stage is the sweet syrup base. Classic Cola uses 380 g of water and 600 g of sugar along with caramel color, phosphoric and citric acid, caffeine and sodium benzoate.
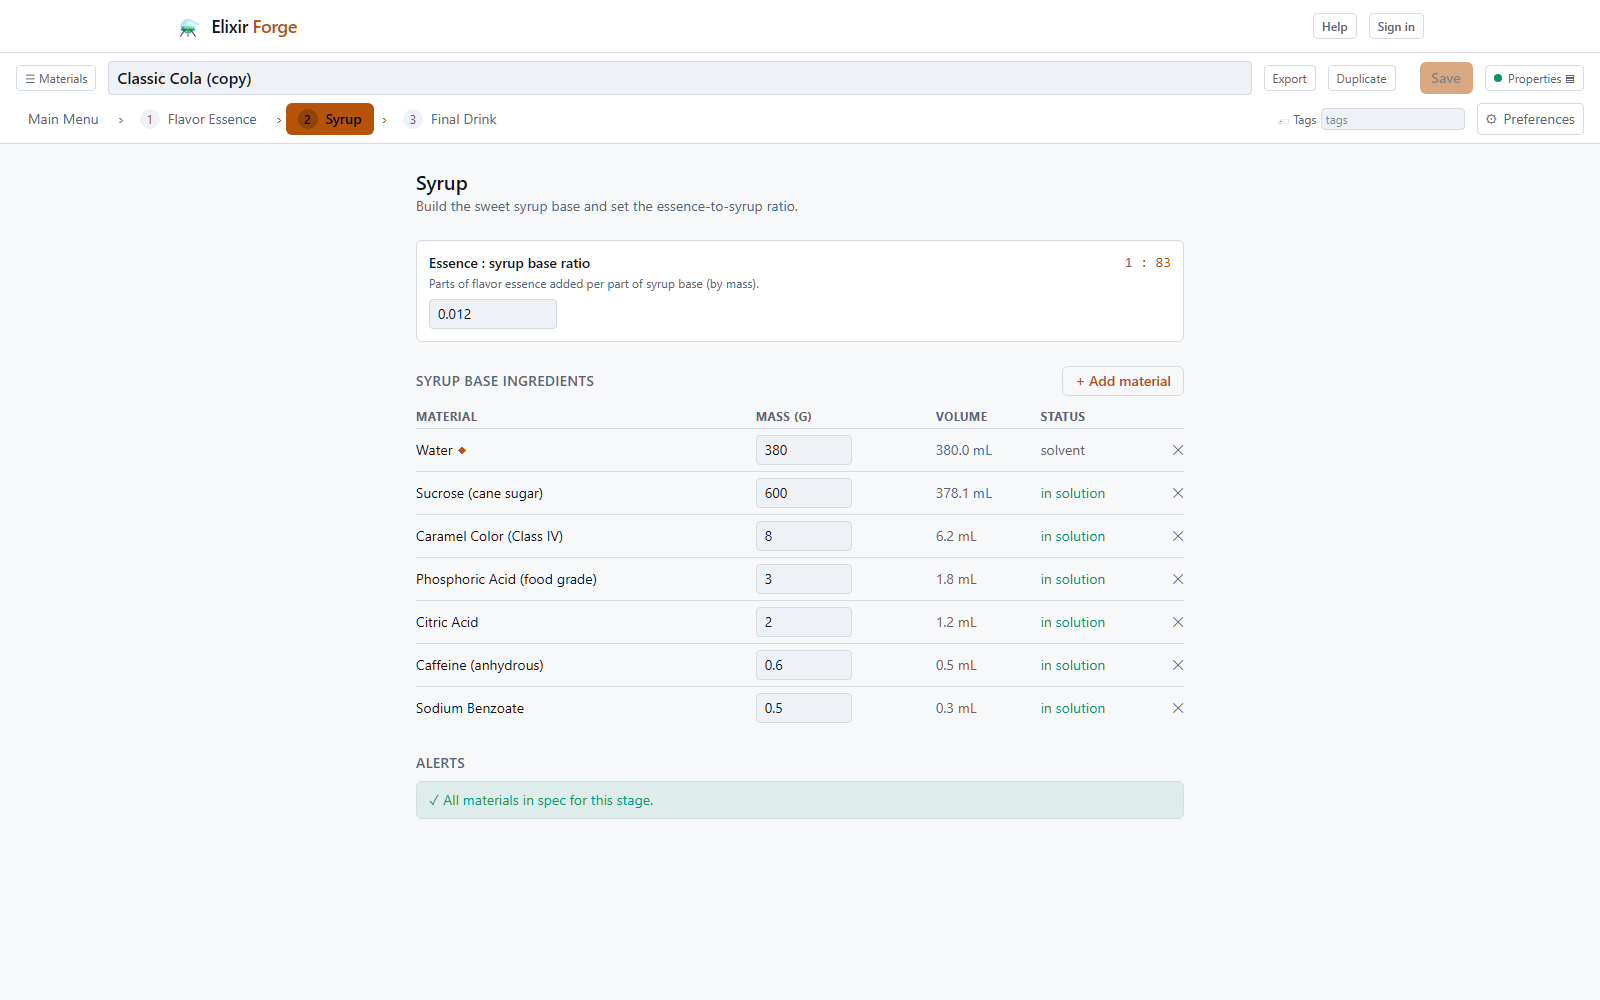
Above the ingredient list is the Essence : syrup base ratio. This is how much of the stage 1 essence goes into each part of syrup by mass. Classic Cola uses 0.012 and the app displays this as 1 : 83. You do not re-enter the essence ingredients here because whatever you built in stage 1 flows into stage 2 at this ratio.
Stage 3: Final Drink
The last stage turns syrup into a finished soda.
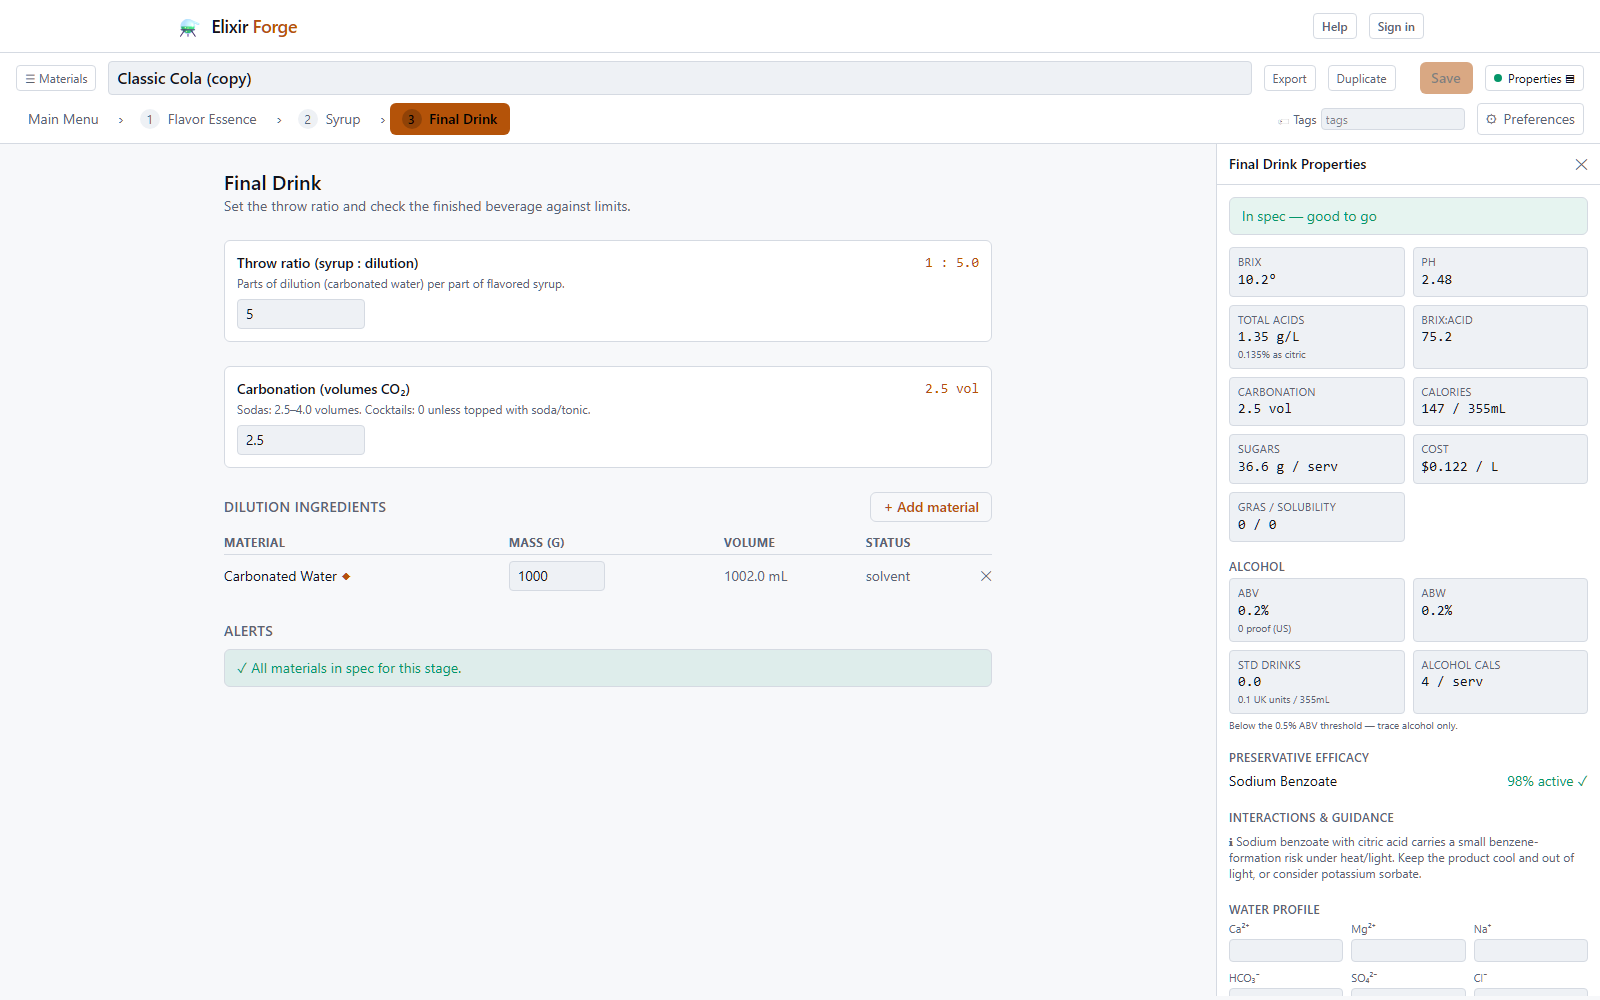
The Throw ratio is the number of parts of carbonated water added per part of syrup and Classic Cola throws at 1 : 5. The Carbonation field sets the CO₂ level in volumes. The app suggests 2.5 to 4.0 volumes for sodas and zero for cocktails unless they are topped with something fizzy.
The properties panel
Click Properties ▤ in the top right corner to open the Final Drink Properties panel. This is where the analysis lives. The dot on the button matches the dot on the library card and turns red when anything is out of spec.
The top of the panel is a grid of numbers for the finished drink:
- Brix measures dissolved solids and for a soda that is essentially sweetness. Classic Cola comes out at 10.2°.
- pH is acid strength and cola is sharp at 2.48.
- Total Acids is the titratable acidity expressed as citric acid and is the main driver of sour bite.
- Brix:Acid is the balance between the two where a lower number is tarter.
- Calories and Sugars are given per serving and Cost is given per litre.
- GRAS / Solubility counts the ingredients which are over their dose limit or out of solution.
Below the grid are the alcohol figures (ABV, proof and standard drinks) and a check on how well each preservative is working at this pH. After that come the interaction warnings and Classic Cola gets one of those. Sodium benzoate combined with citric acid carries a small risk of forming benzene under heat or light. The app suggests keeping the product cool and dark or switching to potassium sorbate.
Further down is an optional water profile along with an estimated color, dietary tags, allergens and a table of the concentration of every ingredient in the final drink in parts per million.
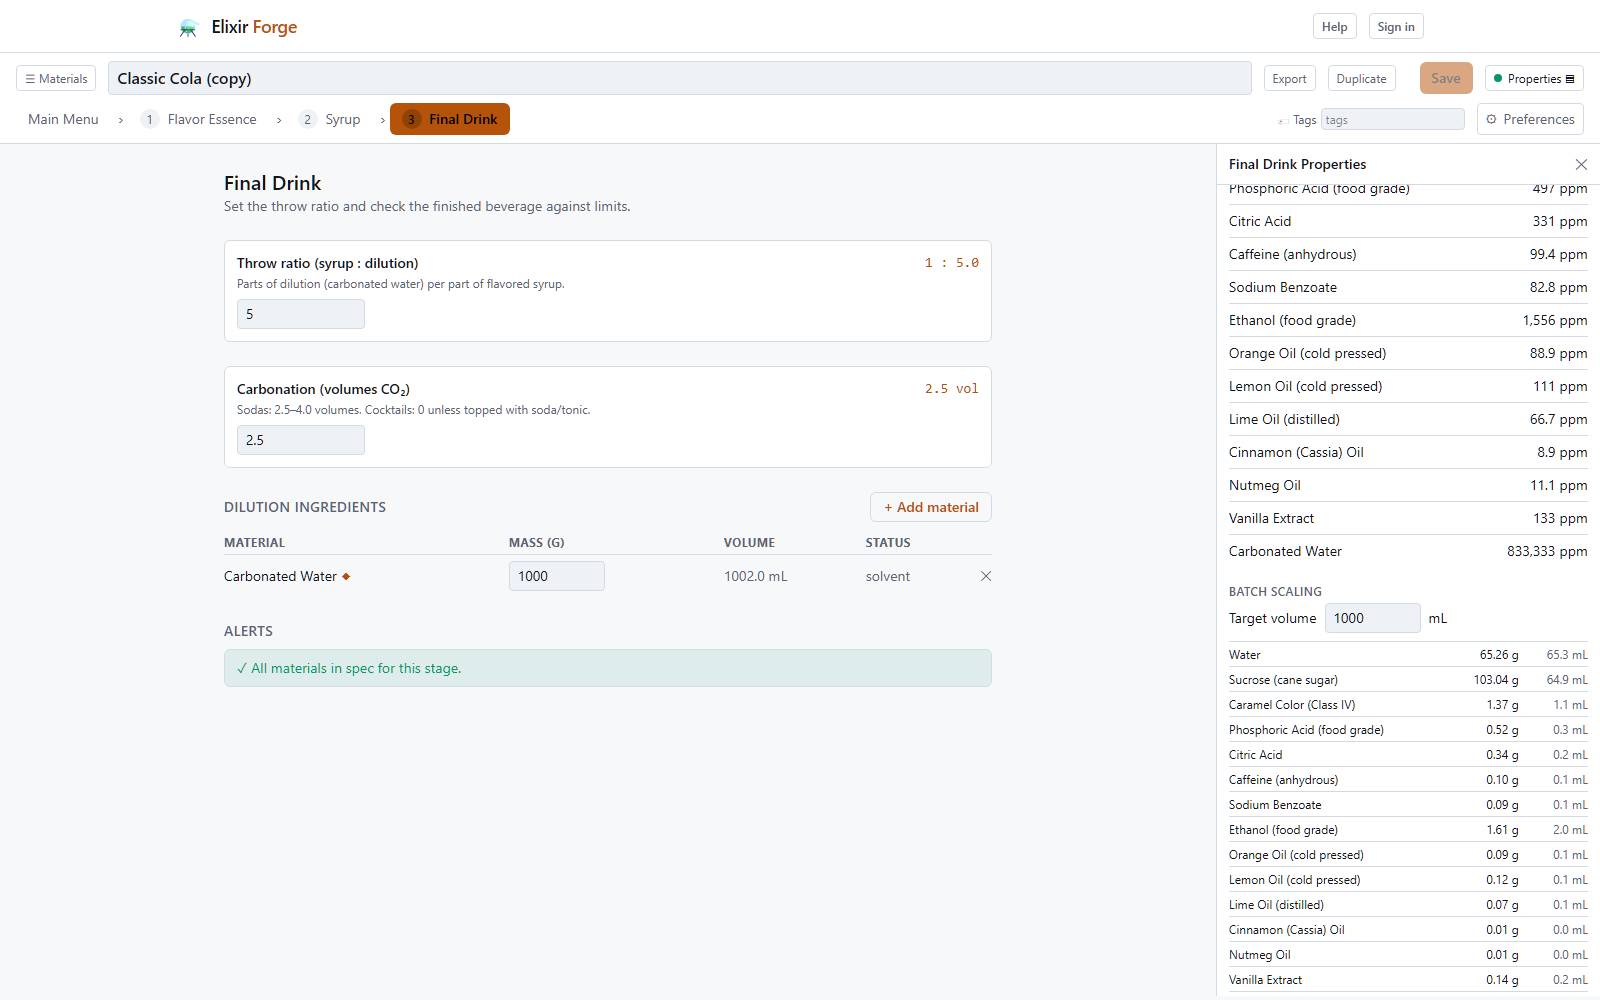
At the very bottom is Batch scaling. Enter a target volume in mL and the panel produces a shopping list with the mass and volume of every ingredient you need. The ⬇ Export label (PDF) button underneath it generates a printable label.
Breaking something on purpose
The best way to understand the alerts is to cause one. Go back to Flavor Essence and change the ethanol from 70 g to 5 g.
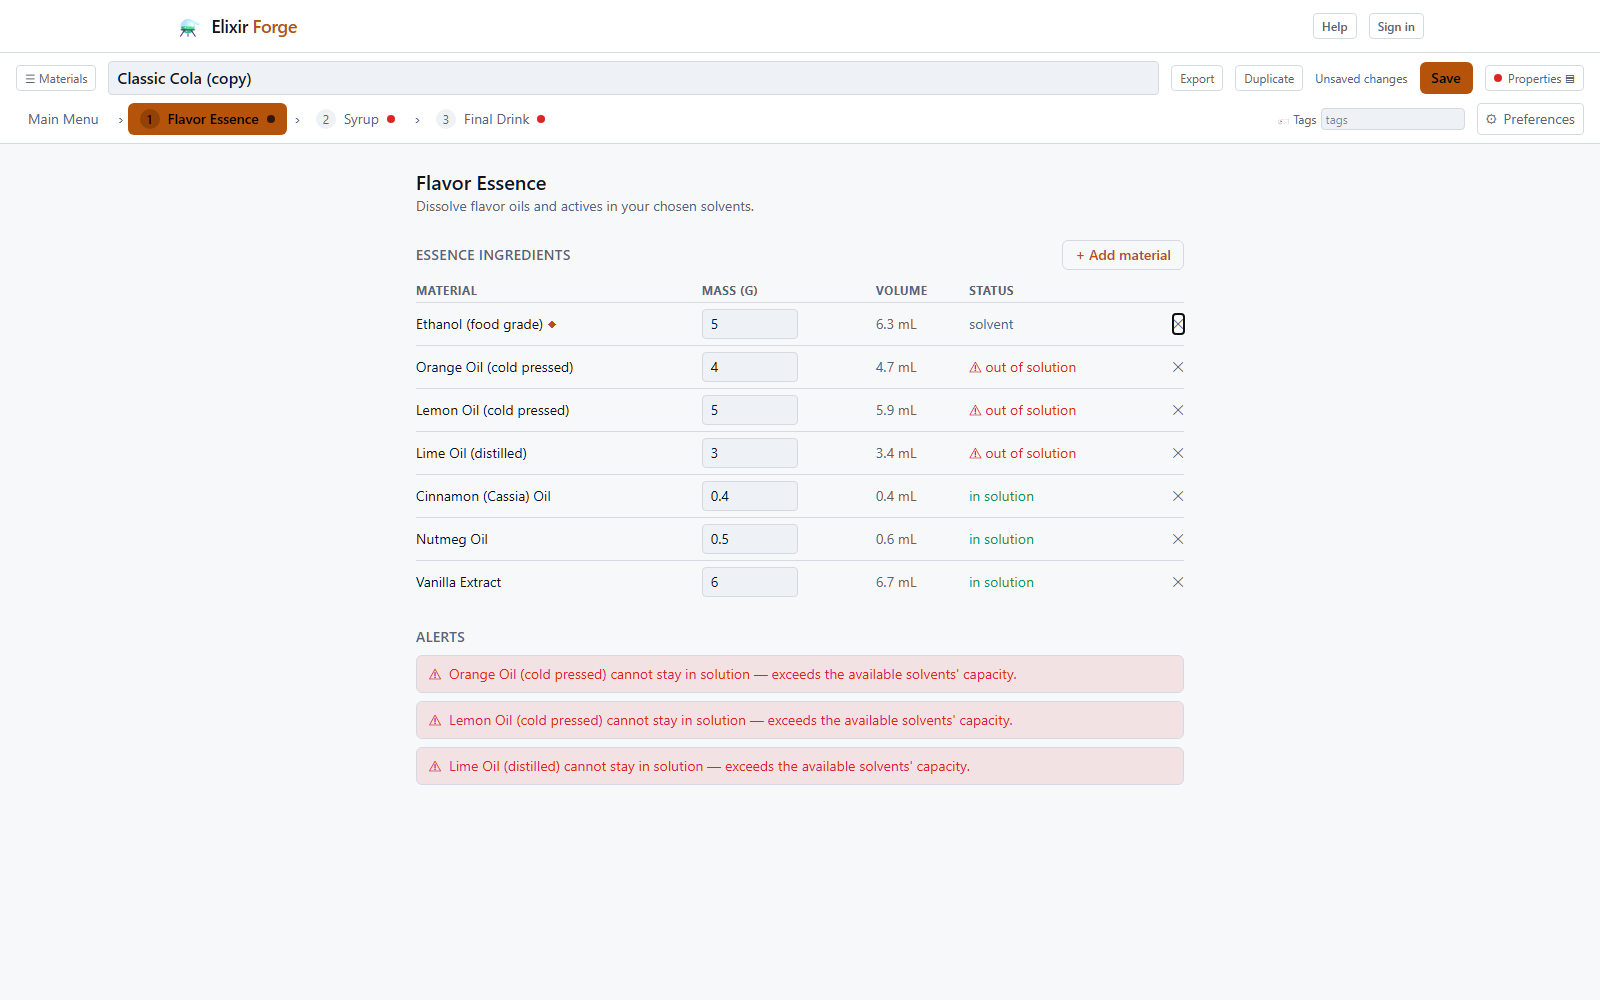
Three of the citrus oils immediately change to "out of solution" because there is not enough solvent left to carry them. The Alerts section at the bottom of the stage lists each of them. Note the red dots which appear next to Syrup and Final Drink in the breadcrumb. Every stage depends on the one before it and a problem in the essence is a problem in the finished drink. Any change you make in an early stage is carried through to every later stage and its alerts.
Click one of the red "out of solution" labels. A dialog opens with every solvent and emulsifier which could fix the problem, ordered by how little of each you would need.
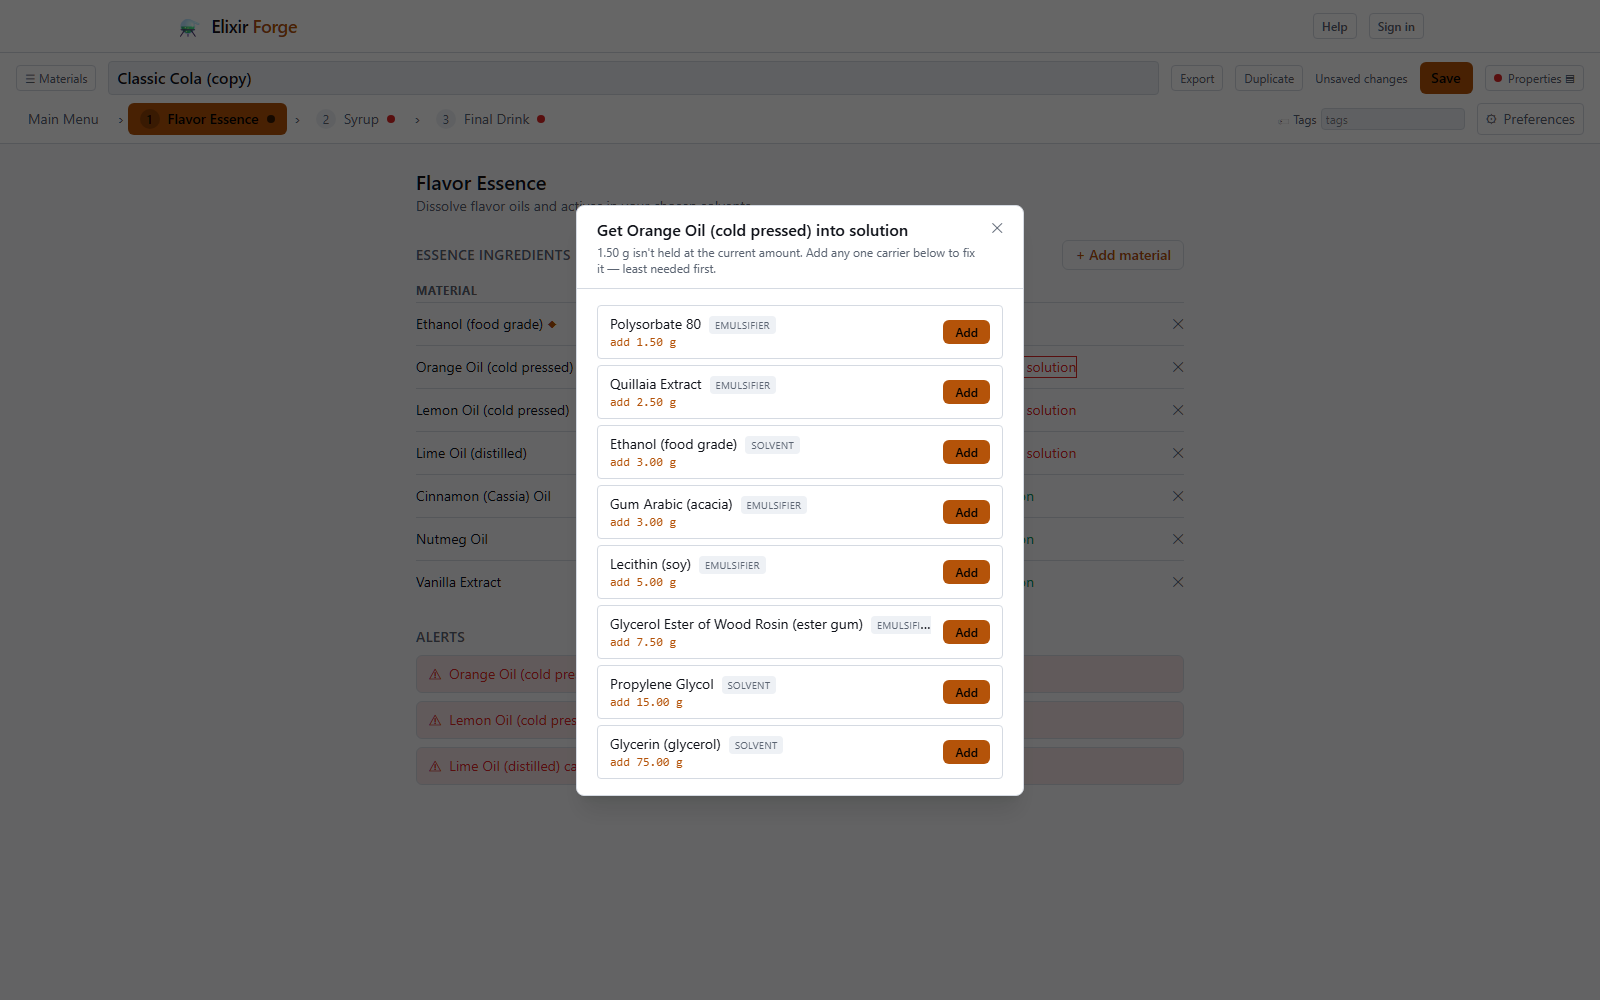
For the orange oil the smallest fix is 1.5 g of polysorbate 80. Adding 3 g of ethanol would also fix this one oil. Click Add on any line and the recipe is updated. Dose limit alerts work much the same way on the Final Drink stage. They tell you which ingredient is over its limit in parts per million and by how much.
Building your own recipe
Click + New Recipe on the library page and choose a template.
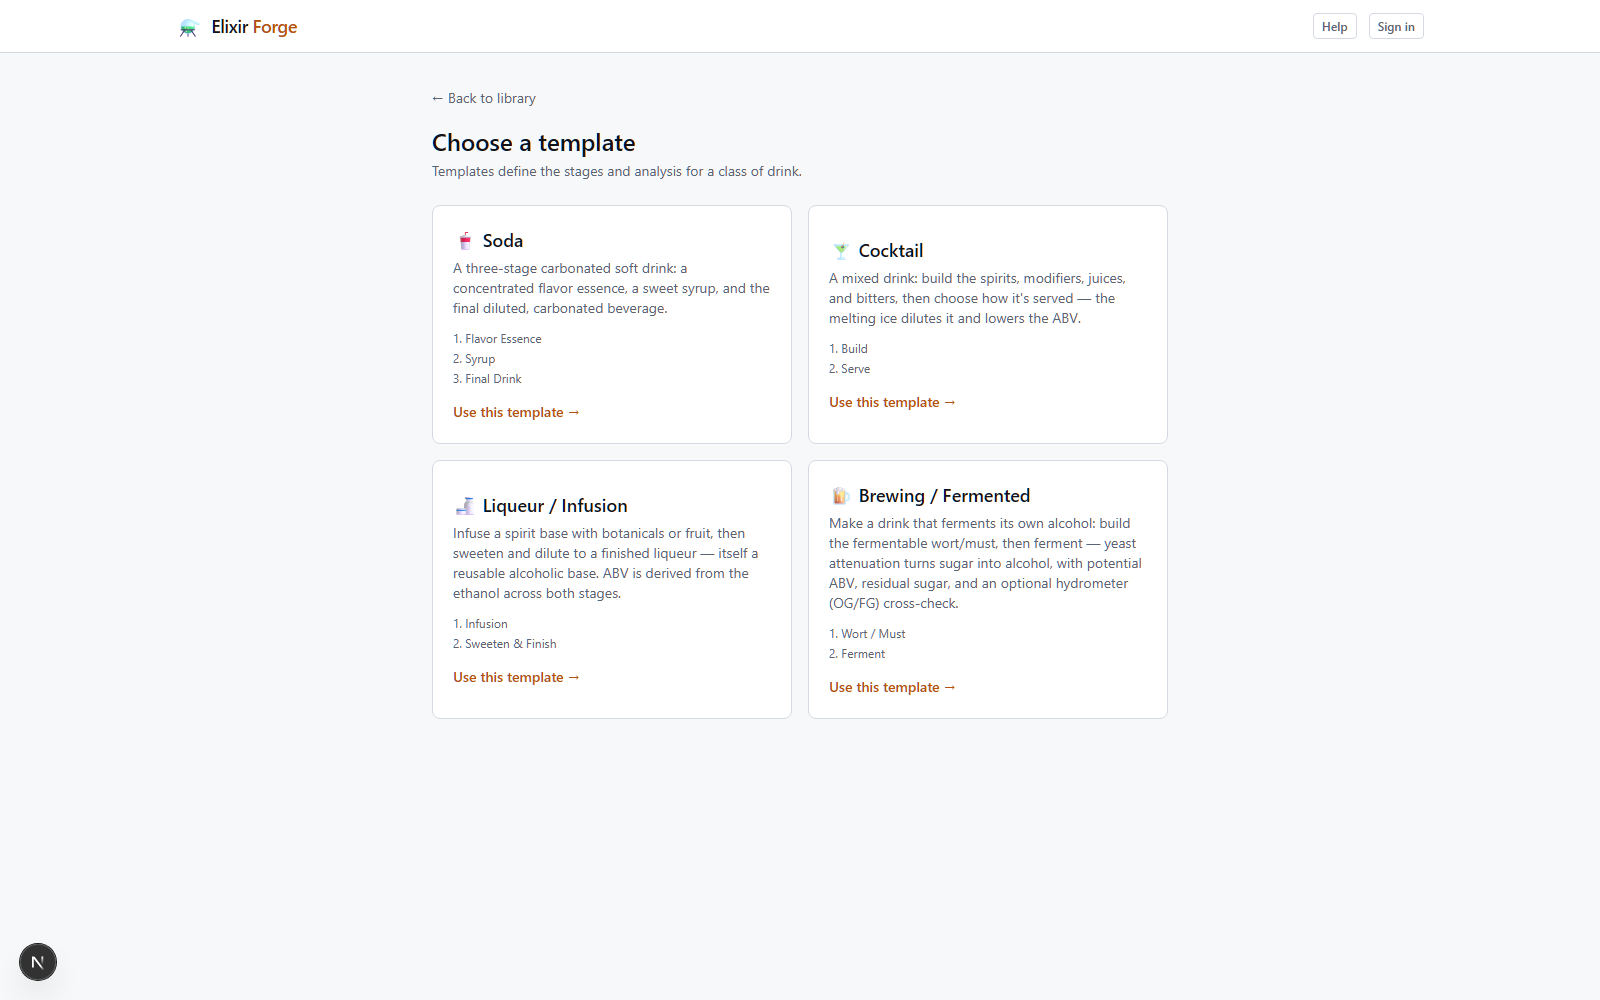
There are four templates to choose from:
- Soda has the three stages covered above.
- Cocktail has Build and Serve stages. The Serve stage asks whether the drink is built, stirred, shaken or blended. Each method adds a different amount of melted ice (10%, 25%, 30% and 60% respectively) which dilutes the drink and lowers the ABV.
- Liqueur / Infusion has Infusion and Sweeten & Finish stages. A liqueur is treated as a base rather than a final drink so the soft drink dose limits are not applied to it.
- Brewing / Fermented has Wort / Must and Ferment stages. The Ferment stage takes an attenuation percentage and optional hydrometer readings (OG and FG) and then estimates the alcohol produced.
Choosing a template creates the recipe immediately and opens it in the editor. Give it a name in the field at the top, add materials to each stage and click Save.
Other useful controls
- ⚙ Preferences switches ingredient entry between mass in grams and volume in mL. It also sets the process temperature (20 °C by default) which controls how much of each ingredient will dissolve.
- Visibility sets a recipe you own to Private, Anyone with link or Public. Once it is no longer Private the 🔗 button copies a shareable link.
- Export downloads the recipe as a JSON file and Import on the library page loads one back in as a new recipe. Since the site is still in development this is the only durable backup you have.
- + New material and + New composite in the Material Library drawer let you add an ingredient which is not already in the library.
- Help in the page header has an FAQ and a form for sending bug reports and feature requests.
Elixir forge is not a replacement for a human taster, but it can save you from hours of predictable mistakes. Please let me know if you have issues or feature suggestions.